Creation of user names, domains, and keys
(Here we take an exemple of Cisco router.)
Firstly, if you haven’t already done so, give your device a personalized name and a domain name:
Router(config)# hostname Toto
Toto(config)# ip domain-name exemple.com
Remember to secure the privileged mode of your device!
Toto(config)# enable secret <mot_de_passe>
Then, we have to tell to our router (or switch) to generate aymetric key pair (required to the SSH connection). We also need to encrypt these keys, we gonna use RSA protocol to do that:
Toto(config)# crypto key generate rsa
We will then be asked to the desired size of the key. Personnaly, I put 1024 bits.
The name for the keys will be: Toto.exemple.com
Choose the size of the key modulus in the range of 360 to 2048 for your
General Purpose Keys. Choosing a key modulus greater than 512 may take a few minutes.

How many bits in the modulus [512]: 1024
% Generating 1024 bit RSA keys, keys will be non-exportable. . . [OK]

Toto(config)#
We will now create a user, it is with his logins that we can connect to the router (or switch) remotely.
Here, I put thomas for the username and admin for the password, but of course you can put any value you want.
Toto(config)# username thomas password admin
Enabling the SSH protocol
On peut maintenant activer le protocole SSH sur notre routeur (ou switch): We can enable the SSH protocol on our device:
Toto(config)# ip ssh version 2
A brief note on the commands that will follow’:'
To connect to a remote device, there are two main protocols: Telnet and SSH. Telnet is a simple protocol that works well, but is not at all secure and encrypted: this means that anyone can intercept the communication frames between you and the device.
SSH is encrypted (thanks to the keys we generated earlier). The standard is that we force our device to communicate only in SSH, and so the connection in Telnet is impossible (for more security).
This is what we are going to do now:
We will first force our switch to accept only incoming SSH communication:
Toto(config)# line vty 0 4
Toto(config)# login local
Toto(config-line)# transport input ssh
Then we do the same for the outgoing communication:
Toto(config-line)# transport output ssh
Now, we can check the configuration changes:
Toto# show running-config
Remember to save the new configuration!
Toto# copy running-config startup-config
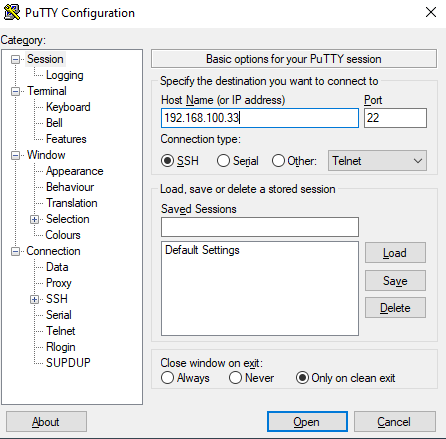
Connection test (with PuTTy)
PuTTy is a free software that allows you to connect to a device in many different ways: serial cable, Telnet, SSH… You can select SSH, then enter the IP address of your Cisco device (mine was 192.168.100.33):
You will then be asked for a username. You can put the one you created before (in my case thomas).
Then you can enter the corresponding password for that user (in my case it’s admin).
And you finally connected!

You will be asked for a password if you want to enter the privileged mode. That’s the one you put during the enable secret <password> command.
That’s all for the SSH connection on Cisco 😁!